Shortcut-S the ultimate keyboard for heavy duty Photoshop users?

Photoshop belongs to the almost every days tools I use and I admit that I am a keyboard junkie.

Keyboard junkie and Photoshop in one sentence? Yeah – that’s hardcore! 

I bet that every heavy duty Photoshop user had a moment of “WTF?!!” occasionally while working with keyboard shortcuts because Photoshop has several hundreds of them.  Did you notice something?

Yes, even if you use a German keyboard, which consists of at least 105 keys, that is a multitude of available keys, so you have to type key combinations with up to 4(!) key presses (e.g. Ctrl+Shift+Alt+E to merge all layers into a new layer or, an easier combination: Ctrl+Shift+I to invert the colors). Apart from some few people with extra long and bendable fingers, I know nobody who can use any of those without 2 hands. This means that you have to move your hand from the mouse or drop the pen of your tablet, press the keys, grab the mouse again etc. pp. which each time costs you at least 2s extra time (I wonder how many hours I have burned this way).

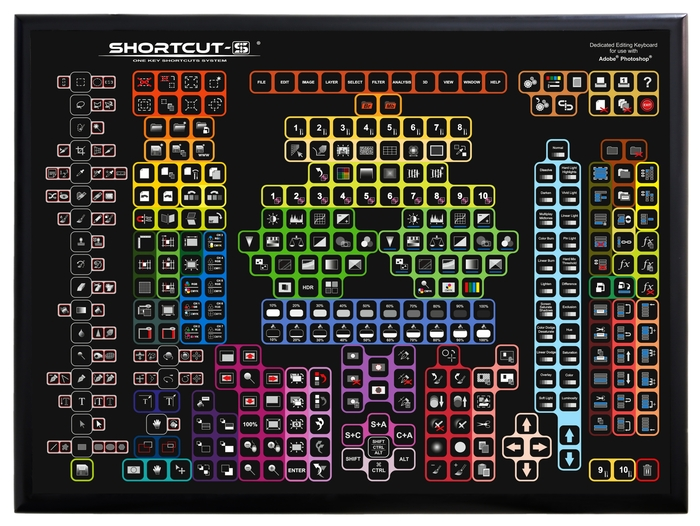
Some people in Romania (Transylvania – yes, Dracula’s castle is nearby, so watch your back for bats) thought that it would be a good idea to ease up the live of the stressed creative people and invented a keyboard that is special tailored for Photoshop. This is what it looks like:

shortcut-s.png

Every shortcut is just one finger-press away. All of them are sorted in logical groups – similar to the menus and palettes in Photoshop to which the keys correspond – and with the fitting icon, so that you see at one glimpse what what key does.

Now comes the bad part: You can not buy it (yet).

It is a kickstarter project – and if it is something you have been looking for for a long time, just head over to support them:

https://www.kickstarter.com/projects/5074048/special-dedicated-editing-keyboard-for-photoshop


I personally would like to use that keyboard too, but  my  desk is full with what I call “creative chaos” (mostly paper, pens, CDs, phones, …) and a 2nd keyboards would not fit on it, especially if it is  as big as the Shortcut-S.  They should really think about integrating a standard mechanical keyboard with MX-blue switches (or better: those of the IBM Model 2 – buckling springs are still the best, so keep on click-clacking  :D) at the bottom too …


… but may be I find someone who builds me  a dedicated desk for that – or I’ll do it by myself. Who knows … 


PS: This is no advertisement. I am not affiliated in any way with that project, I only thought that it could be fun to have or useful for some people.

Who collects data about me while I am surfing?

An interesting plug-in for Firefox can be a real eye opener: Lightbeam (former Collusion) shows who shares with whom and who connects to which third party sites. While activated, Lightbeam collects detailed data about all sites the browser connects to during the session and can display them in multiple views. For a quick overview the graphical view is the most impressive:

Yes, I visited only 3 well known sites during that session and those sited connected to 48(!) third-party sites  (I disabled all content blocking before). Some of those sites are easily capable to correlate the information from multiple sites, thus building up full cross site surfing profiles.

While I can understand that some of the sites have to earn their money with advertisements, this is a bit much for my taste. There are different ways to deliver advertisements without the need to sell off every user of the page to one or more of the big data collectors—sadly almost nobody uses them …

PS: I wonder if it is possible to write a similar extension for chromium based browsers …

Fotoalben von my.opera nach Vivaldi.net übertragen

Sie können ihre Fotos recht einfach von Ihrem my.opera Album nach Vivaldi.net übertragen.

Um ihre Fotos von my.opera  zu speichern, folgen sie diesen Schritten:

1. Loggen Sie sich in my.opera.com ein

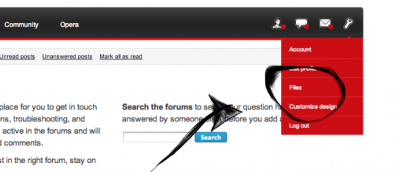
2. Klicken sie auf “Dateien” (Files):

b2ap3_thumbnail_myoperafiles1.jpg

3. Klicken Sie die “Start” Schaltfläche unterhalb von “Export your files to .zip”.

b2ap3_thumbnail_importopera_20131114-102914_1.png

4. Sie erhalten dann eine E-Mail von Opera mit einem Link zu der .zip Datei, welche ihre Bilder enthält. Alternativ können sie auch nach einiger Zeit wieder in my.opera “Dateien” nachschauen, ob die .zip Datei schon dort abgelegt wurde. Der Dateiname ist auffällig.

5. Laden sie diese .zip Datei auf ihren PC herunter und entpacken Sie sie. Sie sollten darin einen Ordner namens “albums” finden.

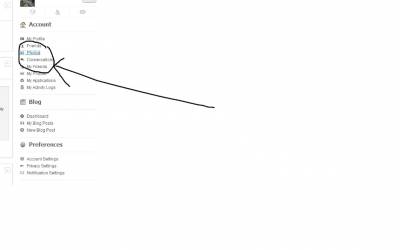
6. Um die Bilder auf Vivaldi.net zu speichern, klicken Sie in der rechten Navigationsleiste auf “Fotos”

b2ap3_thumbnail_photo.jpg

7. Klicken Sie auf “Album erstellen”

b2ap3_thumbnail_createalbum.jpg

  8. Geben Sie den Albumtitel an und klicken Sie auf “Fotos hinzufügen”

b2ap3_thumbnail_importmyopera.jpg

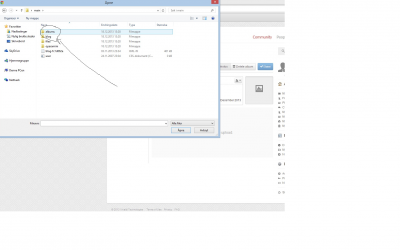
9. Navigieren Sie im Dateiauswahldialog zu dem entpackten my.opera Archiv. Öffnen Sie dort den Unterordner mit dem Namen “albums”. Dort finden Sie die unterschiedlichen my.opera Fotoalben, die sie dann hochladen können.

b2ap3_thumbnail_import2.png

Hinweis:
Die Bilder werden in Ihrem Vivaldi.net Album in umgekehrter Reihenfolge dargestellt, d.h.: Das Bild, welches Sie als letztes hochgeladen haben, wird in ihrem Album als erstes angezeigt.

Vivaldi.net FAQ – Häufig gestellte Fragen – Deutsche Übersetzung

Wie stelle ich ein, welche meiner persönlichen Informationen andere sehen können?

Standardmäßig kann ein Teil der Informationen, die Sie während der Registrierung eingegeben haben, nur von registrierten Nutzern gesehen werden. Wenn Sie diese Einstellungen ändern möchten und Teile Ihrer Informationen auch anderen Nutzern (z.B. nicht registrierten Benutzern) zugänglich machen wollen, oder die Informationen völlig privat bleiben sollen, gehen sie wie folgt vor (am Beispiel der Altersangabe):

  • Klicken Sie in der rechten Navigationsleiste im Abschnitt Einstellungen auf Account Einstellungen.
  • Die Informations- und Einstellungsseite ihres Nutzerkontos sollte jetzt zu sehen sein. Scrollen Sie herunter bis zu Details. Dort können sie ein Icon oder eine Schaltfläche in der Nähe ihrer Geburtsdaten sehen.
  • Klicken sie auf diese Schaltfläche, um ein Menü mit 4 verschiedenen Freigabeebenen zu öffnen:
    • Alle (Sichtbar für alle Internetnutzer)
    • Registrierte Benutzer (Nur für registrierte Nutzer von Vivaldi.net sichtbar)
    • Meine Freunde (Nur für Ihre Freunde innerhalb von Vivaldi.net sichtbar)
    • Nur ich (Ausschließlich für Sie sichtbar)

In der Standardeinstellung ist Ihr Alter nur für Registrierte Benutzer sichtbar. Wenn sie NICHT möchten, dass irgendjemand Ihr Alter sieht, sollten Sie Nur ich auswählen. Vergessen Sie nicht die Speichern Schaltfläche am Ende der Seite zu klicken, nachdem Sie die Einstellungen vorgenommen haben.

Nachdem die Einstellung gespeichert wurde, ist die Altersangabe nicht mehr für andere Benutzer sichtbar, Sie selbst können jedoch weiterhin alle Daten in ihren Account Einstellungen und auf ihrer Profilseite sehen.

Jede einzelne Ihrer persönlichen Informationen ist mit Hilfe der gleichen Symbole individuell anpassbar.

Wie lösche ich meinen Account?

  • Klicken sie in der rechten Navigationsleiste im Abschnitt Einstellungen auf Account Einstellungen.
  • Auf der Linken Seite Ihrer Account Einstellungsseite sollten sie jetzt Account löschen sehen.
  • Klicken sie auf Dein Profil löschen.

Wie erstelle ich einen Blogtitel und eine Beschreibung für mein Blog?

  • Klicken sie in der rechten Navigationsleiste im Abschnitt Blog auf Dashboard.
  • Klicken Sie auf der rechten Seite der grauen Menüleiste Ihres Dasboards auf das Zahnrad Symbol.
  • Im Abschnitt Blog können Sie dann Ihren Blogtitel und die Beschreibung anpassen sowie eine kurze Biographie erstellen.
  • Sie können dort ebenfalls Optimierungen für Suchmaschinen usw. sowie andere Einstellungen für Ihr Blog vornehmen.

Wie optimiere ich mein Blog für Suchmaschinen?

Taggen von Blog Posts

Fügen Sie für Ihre Blog Artikel relevante Tags ein. Werden Sie nicht zu spezifisch: Eine geringere Anzahl breiter gefasster Tags ist besser. Wenn sie existierende Tags verwenden ist es einfacher, Ihren Artikel im Zusammenhang mit anderen relevanten Artikeln in der Tag Cloud zu finden, die auf den Blog Seiten zu sehen ist.

Blog Artikel Meta Daten

Sie können zu Ihrem Artikel eine Meta-Beschreibung und Meta-Keywords (Stichwörter) hinzufügen. Diese werden im Meta Daten Bereich des Quelltexts eingefügt und helfen, die Indizierung durch Suchmaschinen zu verbessern. Auch hier gilt: Klasse statt Masse! Schreiben Sie einen einzelnen Satz in die Beschreibung, der sich auf Ihren Artikel bezieht. Die Stichwörter sollten ebenfalls die Tags enthalten, die sie vergeben haben. Zu viele Stichwörter können unter Umständen zu einer Abwertung in der Bewertung führen.

Foto Namen und Beschreibungen

Wenn sie Namen und Beschreibungen zu ihren Fotos hinzufügen, machen Sie sie für die vivaldi.net Suche auffindbar.

Wie kann ich externe Bilder einbinden?

Auf Vivaldi.net kümmern wir uns um die Sicherheit Ihrer Daten, deshalb werden sie ausschließlich über zertifizierte sichere HTTPS Verbindungen übertragen. Eine solche Zertifizierung ist ungültig, wenn eine Seite ein über eine ungesicherte HTTP Verknüpfung eingebettetes Objekt enthält.

Hot-linking (d.h. direktes verlinktes einbinden der Medien von Drittparteien Domains) ist eine schlechte Praxis, denn der Speicherort der Medien kann verändert, oder das direkte einbetten verhindert werden. Um verschwindende Inhalte und eine Beeinträchtigung der gesicherten Verbindung zu vermeiden, raten wir von einer Verknüpfung von externen Ressourcen ab. Bitte laden Sie freigegebene Medien auf Vivaldi.net hoch und verknüpfen Sie sie vor Ort. Bitte beachten Sie, dass Sie gemäß unserer Nutzungsbedingungen nur von Ihnen selbst erstelltes, oder zur Veröffentlichung freigegebenes, oder nicht urheberrechtlich geschütztes Material veröffentlichen dürfen.

Wie verschiebe ich meine E-Mails von einem anderen E-Mail Anbieter?

Am einfachsten verschieben Sie ihre E-Mails, wenn sie sowohl Vivaldi Mail als auch ihren derzeitigen E-Mail Anbieter in ihrem E-Mail Client (z.B. (e.g. Opera M2, Thunderbird, usw.) für IMAP einrichten. Nachdem sie beide Accounts eingerichtet haben, können Sie die E-Mails einfach aus dem IMAP Ordner ihres derzeitigen Anbieters in den IMAP-Ordner von Vivaldi Mail verschieben.

Eine Schritt für Schritt Anleitung am Beispiel von My Opera Mail und M2 finden Sie in diesem Artikel.

Nachdem Sie alle E-Mails verschoben haben, können Sie auch über das Vivaldi-Mail Web-Interface darauf zugreifen. Wenn Sie auch die von ihnen gesendeten E-Mails verschieben möchten, vergessen Sie nicht, die E-Mail aus dem Gesendet oder ähnlich benannten IMAP-Ordner zu verschieben.

Nach dem Umzug können sie auch eine Weiterleitung von ihrem derzeitigen E-Mail Anbieter zu Vivaldi Mail einrichten, um zu vermeiden dass Sie mehrere Konten abfragen müssen.

Wie viel E-Mail Speicherlatz steht mir zur Verfügung?

Derzeit werden 5 GB zur Verfügung gestellt.

Wie richte meinem E-Mail Client für das Vivaldi E-Mail Konto ein?

Richten Sie Ihrem Desktop- oder mobilen E-Mail Client auf folgende IMAP Einstellungen ein:

IMAP Einstellungen

Server Typ
IMAP Mail Server
Server Name
mail.vivaldi.net
Port
993

Wenn Sie stat dessen POP3 bevorzugen, richten sie das E-Mail Konto wie folgt ein:

POP3 Einstellungen

Server Typ
POP3 Mail Server
Server Name
mail.vivaldi.net
Port
995

Sicherheitseinstellungen

Verbindungssicherheit
SSL/TLS
Authentifizierungsmethode
Nur Text
Benutzername
Ihr Vivaldi.net Benutzername
Passwort
Ihr Vivaldi.net Passwort

SMTP Einstellungen

Server Name
mail.vivaldi.net
Port
465

Sicherheitseinstellungen

Verbindungssicherheit
SSL/TLS
Authentifizierungsmethode
Nur Text
Benutzername/Passwort
Wie bei IMAP

Wie kann ich die RSS Feeds App benutzen, um Feeds meiner Wahl in meinem Profil anzuzeigen?

  • Klicken Sie in der rechten Navigationsleiste im Abschnitt Account auf Meine Apps.
  • Finden Sie die Feeds App in der Liste und klicken Sie auf Installieren.
  • Nachdem die App installiert ist, klicken Sie auf den Community Link in der oberen Navigationsleiste oder auf das Vivaldi.net Logo in der linken oberen Ecke.
  • Klicken Sie in der linken Navigationsleiste unterhalb des Vivali.net Logos im Abscnitt Apps auf Feeds
  • Klicken Sie auf die Neuer Feed Schaltfläche.
  • Sie sehen nun ein Pop-Up in welchem Sie den Titel und die URL des Feeds eintragen und auf Feed erstellen klicken können.
  • Der eingetragene Feed sollte jetzt in ihrem Profil zu sehen sein.

Wo befinden sich die Vivaldi Server?

Sie werden in Island gehostet, wo auch viele unserer Mitarbeiter wohnen. Wir benutzen Cloudflare als unser CDN um die Seitenladegeschwindigkeit zu verbessern. Unser E-Mail-Dienst verwendet KEIN CDN und wird ausschließlich von unserem Rechenzentrum in Island zur Verfügung gestellt.

Zusätzliche Informationen über Cloudflare (Englisch)
WebP Photoshop plugin

I was looking for some time for a plug-in that would allow me to open, edit and save WebP files directly with Photoshop instead of converting them afterwards. Sadly Adobe did not a**e up to provide one, but luckily someone else managed to write the necessary .8bi file. Here it is:

https://github.com/fnordware/AdobeWebM

 (scroll down a bit for the ready made plug-in for PS Mac and Win)


The same author wrote another .8bi plug-in for PNG files, that, among some other goodies, allows to split the PNG Alpha channel to an alpha layer in the channel palette and produces astonishingly compact PNG files on save. Grab it here:

http://www.fnordware.com/superpng/


Sadly both plug-ins wont work with CS2 on my small computer – but they work just fine with CS5 on my big computer edit: The  plug-ins work just fine from CS2 to CS6 if put into the plug-ins/File Format folder (despite the WebP plug-in is labeled “Beta”).  

If you own another version of Photoshop and get it up and running:

Please drop a line in the comments.

Thank You!

About Google … (001)

An older but still relevant video about Google, made by the TV broadcast company ABC:

( External link if you want to watch the video on youtube: www.youtube.com/watch?v=R7yfV6RzE30

Search engine, mail service, instant messenger, camera surveillance, network (web) infrastructure, power supplier, operating systems, hardware, entertainment, telecommunication infrastructure, health insurance, genetic engineering …

You don’t need to be too paranoid to become a bit wary about their motives.

Don’t be evil!
seems to be a nice motto, but I wonder why they put it as categorical imperative instead of
We will not be evil!

Honi soit …

PS, Google knows that you have read this article and watched this video. YouTube == Google 😉

Google custom search, the simple side of google

Outdated – Google switched the custom search off

“Everyone” uses Google, so do I (among other search engines) but the Google page got a bit heavy over the years and I felt watched. If you look into the page source you see all kind of stuff that monitors your behavior while you are on the page, where you hover, where you click and if you click, it redirects you over one of their servers. That way they collect a complete browsing history (admit it: Apart from some pages you have bookmarked, all of your web visits somehow start with Google ;)) which is not what I want. 

Some day I found out that Google offers a special search, called Google Custom.

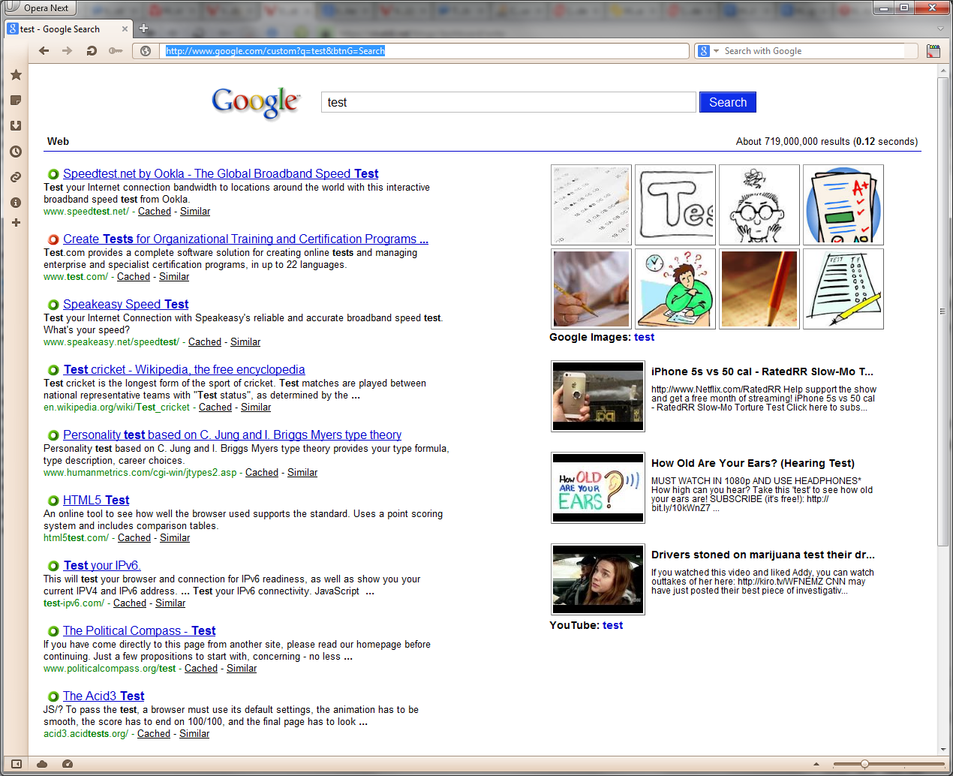
The result page already looks quite clean, (see the source code of this “test” search:  http://www.google.com/custom?q=test&btnG=Search ) but it could be improved a bit. During an ICQ session BS-Harou and I had the idea to clean it up a little bit more and to “pimp” it a bit by adding some extras like a search for related YT videos and images.

This is the result:

google-custom.png

and this is the code of the userJS and CSS we created:

// ==UserScript== // @name           Nicer Google/custom search // @author         BS-Harou, QuHno // @description    prettifies www.google.com/custom?q=%s  searches, adds links to the top 8 query related images and top 3 related YouTube Videos // @include        http://www.google.com/custom* // @version        1.0.12 // ==/UserScript==  document.addEventListener('DOMContentLoaded', function() { 	var block = document.createElement('div'); 	block.id = 'userjs-block'; 	 	// QuHno: No link replacement for me. 	var theA = document.querySelectorAll('A'); 	for (var i = theA.length - 1; i >= 0; i--) { 		theA[i].onmousedown = null; 	} 	window['curwt'] = null; 	  	function getQueryVariable(variable) { 		var query = window.location.search.substring(1); 		var vars = query.split('&'); 		for (var i = 0; i < vars.length; i++) { 			var pair = vars[i].split('='); 			if (decodeURIComponent(pair[0]) == variable) { 				return pair[1]; 			} 		} 	}  	function insertAfter(newNode, referenceNode) { 		referenceNode.parentNode.insertBefore(newNode, referenceNode.nextSibling); 	}  	function addImage(url, realUrl, title) { 		var link = document.createElement('a'); 		link.href = realUrl; 		link.className = 'userjs-image-link'; 		link.title = title.replace(/<\/?b>/g,''); // QuHno: remove ugly <B> tags  		var tmp = new Image(url); 		tmp.src = url; 		tmp.className = 'userjs-image'; 		tmp.width = 100; 		tmp.height = 100;  		link.appendChild(tmp); 		block.appendChild(link); 	}  	function addVideo(url, realUrl, title, desc) { 		var link = document.createElement('a'); 		link.href = realUrl; 		link.className = 'userjs-video-link'; 		link.title = title;  		var tmp = new Image(url); 		tmp.src = url; 		tmp.className = 'userjs-video'; 		tmp.width = 120; 		tmp.height = 90;  		var text = document.createElement('span'); 		text.className = 'userjs-video-text'; 		text.innerHTML = title;  		var descEle = document.createElement('span'); 		descEle.className = 'userjs-video-desc'; 		descEle.innerHTML = desc;  		link.appendChild(tmp); 		link.appendChild(text); 		link.appendChild(descEle);  		block.appendChild(link); 	} 	 	// QuHno: add search for more videos or images. Should this be inlined? 	function searchMore(what) {         var theHref, theInnerHTML, theQuery = getQueryVariable('q');                  switch(what) {             case 'images':                 theHref = 'https://encrypted.google.com/search?q=' + theQuery + '&ie=UTF-8&tbm=isch&sa=N';                 theInnerHTML = 'Google Images: <span class="link">' + decodeURIComponent(theQuery).replace(/[+]/g,' ') + '</span>';                 break;             case 'videos':                 theHref = 'https://www.youtube.com/results?q=' + theQuery;                 theInnerHTML = 'YouTube: <span class="link">' + decodeURIComponent(theQuery).replace(/[+]/g,' ') + '</span>';                 break;             default: return;         }                  var link = document.createElement('a');         link.href = theHref;         link.innerHTML = theInnerHTML;         link.className = 'userjs-more-link';                  block.appendChild(link);     }      window.imageHandler = function(data) {         var tmp;         if (data && data.hasOwnProperty('responseData') && data.responseData && typeof data.responseData == 'object' && data.responseData.hasOwnProperty('results')) {             for (var i=0; i < 8 && i < data.responseData.results.length; i++) {                 tmp = data.responseData.results[i];                 addImage(decodeURIComponent(tmp.tbUrl), tmp.unescapedUrl, tmp.title);             }             searchMore('images'); // QuHno: add direct link to Google image search                          //document.querySelector('#res').appendChild(block);             //document.querySelector('#res').insertBefore(block, document.querySelector('#navbar'));             insertAfter(block, document.querySelector('#res div')); // QuHno: changed because of "Did you mean"         }          var videoLoader = document.createElement('script');         videoLoader.src = 'https://gdata.youtube.com/feeds/api/videos?q=' + getQueryVariable('q') + '&v=2&alt=jsonc&callback=videoHandler&max-results=3';          document.body.appendChild(videoLoader);     };      window.videoHandler = function(data) {         var tmp;         if (data && data.hasOwnProperty('data') && data.data.hasOwnProperty('items')) {             for (var i=0; i < 3 && i < data.data.items.length; i++) {                 tmp = data.data.items[i];                 addVideo(tmp.thumbnail.sqDefault, tmp.player.default, tmp.title, tmp.description);             }             searchMore('videos'); // QuHno: add direct link to YouTube video search                          //document.querySelector('#res').appendChild(block);             //document.querySelector('#res').insertBefore(block, document.querySelector('#res div'));         }     };      var imageLoader = document.createElement('script');     imageLoader.src = 'https://ajax.googleapis.com/ajax/services/search/images?q=' + getQueryVariable('q') + '&v=1.0&callback=imageHandler&rsz=8';     document.body.appendChild(imageLoader);          // QuHno: embedded the CSS in the script. No need to set up a site specific userCSS.     var css = '\r\n\ html { \r\n\     color: #000;\r\n\     background: #f2f2f2;\r\n\ }\r\n\ #navbar, #res > p { \r\n\     clear: both;\r\n\ } \r\n\ .tc img { \r\n\     height: 60px;\r\n\     width: 130px;\r\n\ }\r\n\ #res li:first-of-type .g { \r\n\     margin: 0;\r\n\ }\r\n\ body { \r\n\     padding: 0 40px;\r\n\     max-width: 80rem;\r\n\     margin: 0 auto;\r\n\     box-sizing: border-box;\r\n\ }\r\n\ table.ra, body > table + table { \r\n\     display: none;\r\n\ }\r\n\ #res > p:first-child + div, #res > div:first-child { \r\n\     padding: 20px 0;\r\n\     float: left;\r\n\ }\r\n\ /*#res li*/.g { \r\n\     break-inside: avoid;\r\n\     margin: 20px 0;\r\n\ }\r\n\ input[name=q] { \r\n\     padding: 4px 8px;\r\n\     font-size: 1rem;\r\n\     vertical-align: middle;\r\n\     border: 1px solid #bbb;\r\n\     width: 500px;\r\n\ }\r\n\ input[name=q]:hover, input[name=q]:focus { \r\n\     border: 1px solid #777;\r\n\ }\r\n\ input[name=btnG] { \r\n\     border: 1px solid rgba(0, 0, 0, 0.400);\r\n\     box-shadow: inset -10px -15px 30px rgba(0, 0, 0, 0.102), inset 1px 1px 1px rgba(255, 255, 255, 0.506);\r\n\     transition: background-color 0.1s;\r\n\     background-color: #1133F7;\r\n\     color: #FFF;\r\n\     font-size: 1rem;\r\n\     padding: 4px 12px 4px 12px;\r\n\     box-sizing: border-box;\r\n\     line-height: 1.24;\r\n\     vertical-align: middle;\r\n\     cursor: pointer;\r\n\ }\r\n\ input[name=btnG]:hover { \r\n\     color: #FFF;\r\n\     background-color: #14F;\r\n\ }\r\n\ #userjs-block { \r\n\     float: right;\r\n\     box-sizing: border-box;\r\n\     padding: 15px 30px;\r\n\     width: 45%;\r\n\ }\r\n\ .userjs-image { \r\n\     -o-object-fit: cover;\r\n\     -o-object-position: top left;\r\n\     color: #00C;\r\n\     background: #111;\r\n\     overflow: hidden;\r\n\     margin: 3px;\r\n\ }\r\n\ .userjs-image-link { \r\n\     margin: 2px;\r\n\     border-bottom: 1px solid #666;\r\n\     border-left: 1px solid #999;\r\n\     border-right: 1px solid #666;\r\n\     border-top: 1px solid #999;\r\n\     overflow: hidden;\r\n\     display: inline-block;\r\n\ }\r\n\ .userjs-video { \r\n\     -o-object-fit: cover;\r\n\     float: left;\r\n\     -o-object-position: top left;\r\n\     border-bottom: 1px solid #666;\r\n\     border-left: 1px solid #999;\r\n\     border-right: 1px solid #666;\r\n\     border-top: 1px solid #999;\r\n\     padding: 2px;\r\n\     color: #00C;\r\n\     background: #FFF;\r\n\     overflow: hidden;\r\n\     margin: 3px 3px 3px 0;\r\n\     vertical-align: top;\r\n\ }\r\n\ .userjs-video-link { \r\n\     margin: 2px;\r\n\     margin-top: 20px;\r\n\     overflow: hidden;\r\n\     display: block;\r\n\     text-decoration: none;\r\n\ }\r\n\ .userjs-video-text { \r\n\     padding: 10px 0 0 5px;\r\n\     display: inline-block;\r\n\     color: #000;\r\n\     font-size: 14px;\r\n\     font-weight: bold;\r\n\     width: 300px;\r\n\     white-space: nowrap;\r\n\     overflow: hidden;\r\n\     text-overflow: ellipsis;\r\n\ }\r\n\ .userjs-video-link:hover, .userjs-video-text:hover, .userjs-more-link:hover { \r\n\     text-decoration: underline;\r\n\ } \r\n\ .userjs-video-desc { \r\n\     display: block;\r\n\     padding: 10px 0 0 5px;\r\n\     font-weight: normal;\r\n\     font-size: 12px;\r\n\     line-height: 1;\r\n\     text-decoration: none;\r\n\     color: #000;\r\n\     float: left;\r\n\     width: 300px;\r\n\ }\r\n\ .userjs-more-link { \r\n\     overflow: hidden;\r\n\     color: #000;\r\n\     font-size: 14px;\r\n\     font-weight: bold;\r\n\     display: block;\r\n\     text-decoration: none;\r\n\     text-overflow: ellipsis;\r\n\ }\r\n\ @media all and (max-width: 69rem) {\r\n\     #userjs-block { \r\n\     display: none;\r\n\     }\r\n\ }\r\n\ @media all and (max-width: 55rem) {\r\n\     .tc img { \r\n\         display: none;\r\n\     }\r\n\     input[name=q] { \r\n\         width: 300px;\r\n\     }\r\n\ }\r\n\ @media all and (max-width: 80rem) { \r\n\     body { \r\n\         padding: 20px;\r\n\     }\r\n\ }\r\n',         head = document.getElementsByTagName('head')[0],         style = document.createElement('style');          if (style.styleSheet){      style.styleSheet.cssText = css;     } else {      style.appendChild(document.createTextNode(css));     }     head.appendChild(style); }); 

Just install it in your userJS capable browser (Opera

(PS: the WOT rings don’t belong to this script, that’s another one – not the official extension, but something lightweight.)

IE, generated select boxes, change event and WTF?!

While I was writing a bigger JS project, I needed a generated select box that was filled with its options from somewhere. I tested it in Opera 11 and all was good. Then I opened Firefox and it worked, as it did in Chromium.

Did you notice something?

Yeah – IE is still missing. So fired up IE – 11 even – and, almost needless to say: It did not work 🙁

Normally the select box should fire a change event as soon as an option finally gets selected. While this works as intended in this example taken from MSDN:

<!DOCTYPE html> <html>  <head>   <title>onchange Event Sample</title> </head>  <body>   <h1>onchange Event Sample</h1>   <form>     <p>Select a different option in the drop-down listbox to trigger the <strong>onchange</strong> event.</p> 		<select name="selTest" onchange="alert('Index: ' + this.selectedIndex + '\nValue: ' + this.options[this.selectedIndex].value)">       <option value="Books">Books</option>       <option value="Clothing">Clothing</option>       <option value="Housewares">Housewares</option>     </select>   </form> </body>  </html> 

… it definitely does not work when the whole thing is set up a bit more complex like this (short excerpt, imagine the missing rest):

===================================================== menu.js =====================================================   function Menu() {         this.init(); }  Menu.prototype =  {     menucontainer: null,          foregroundColor: null,     backgroundColor: null,          selector: null,     save: null,     clear: null,     about: null,          init: function()     {         var option, space, separator, color_width = 15, color_height = 15;          this.menucontainer = document.createElement("div");         this.menucontainer.className = 'gui';         this.menucontainer.id = 'gui';         this.menucontainer.id = "menucontainer_menu";         this.menucontainer.style.position = 'absolute';         this.menucontainer.style.top = '0px';                  this.selector = document.createElement("select");          for (i = 0; i < BRUSHES.length; i++)         {             option = document.createElement("option");             option.id = i;             option.value = BRUSHES[i];             option.text = BRUSHES[i].toUpperCase();             this.selector.appendChild(option);         }         this.menucontainer.appendChild(this.selector);     } } ========================================== main.js  ========================================== var brush, BRUSHES = ["foo", "bar",  "", "baz", "bam"];  menu = new Menu(); menu.selector.onchange = onMenuSelectorChange;  /* ...  */ if (!brush)	{ 	brush = new window[BRUSHES[0]](context); }  /* ... */ function onMenuSelectorChange() {     if (BRUSHES[menu.selector.selectedIndex] == "")         return;      brush.destroy();     brush = new window[BRUSHES[menu.selector.selectedIndex]](context);      window.location.hash = BRUSHES[menu.selector.selectedIndex];     menu.selector.blur(); } 

So, what happens with IE here?

If the index was once set programatically, IE simply “forgets” to fire the change event, you can’t even select an option with the mouse. Opening the select box, moving to the option with the mouse and then pressing the [Enter] key surprisingly worked, so the select box was created and the event listener was attached to the select box. It seems that the select box only has a slight focus problem if you want to select something by using the mouse only. In the end it came down to a missing focus problem on the select element.

Solution

I added some extra code for IE – yes I used browser sniffing because I don’t know how to detect b0rked behavior of a browser.

menu = new Menu(); if(navigator.userAgent.indexOf(' MSIE ') > -1 || navigator.userAgent.indexOf(' Trident/') > -1){ menu.selector.onclick = (function() {     this.blur();     this.focus();   });  } menu.selector.onchange = onMenuSelectorChange; 

Not perfect, but it works – which is good enough for me now. If anyone has a better solution: I am willing to learn, please post it in the comments. Thank You!

PS: No, I don’t know what the MS devs were smoking when they implemented that behavior …